From describing the movement of the Earth in our solar system to simply turning a doorknob to enter our room, we use the term (and concept of) "rotation" frequently in our daily lives.
In math, we study rotation as one of the 4 geometric transformations.
We’ve prepared this middle-school-friendly guide for you to explore rotation as a geometric transformation using easy-to-follow definitions, simple guides, and solved examples.
What Is Rotation in Math?
Rotation in mathematics is a geometric transformation that turns a figure around a fixed point called the center of rotation.
Rotation is one of the 4 geometric transformations which also include:
Examples of Rotation in Everyday Life
We are rotating at this very moment—literally! Our planet, Earth, rotates (or, as some say, spins) around its own axis, completing the journey in 24 hours relative to the sun.
Yes, that is how we measure days!
One day equals the Earth’s one full rotation around its own axis.
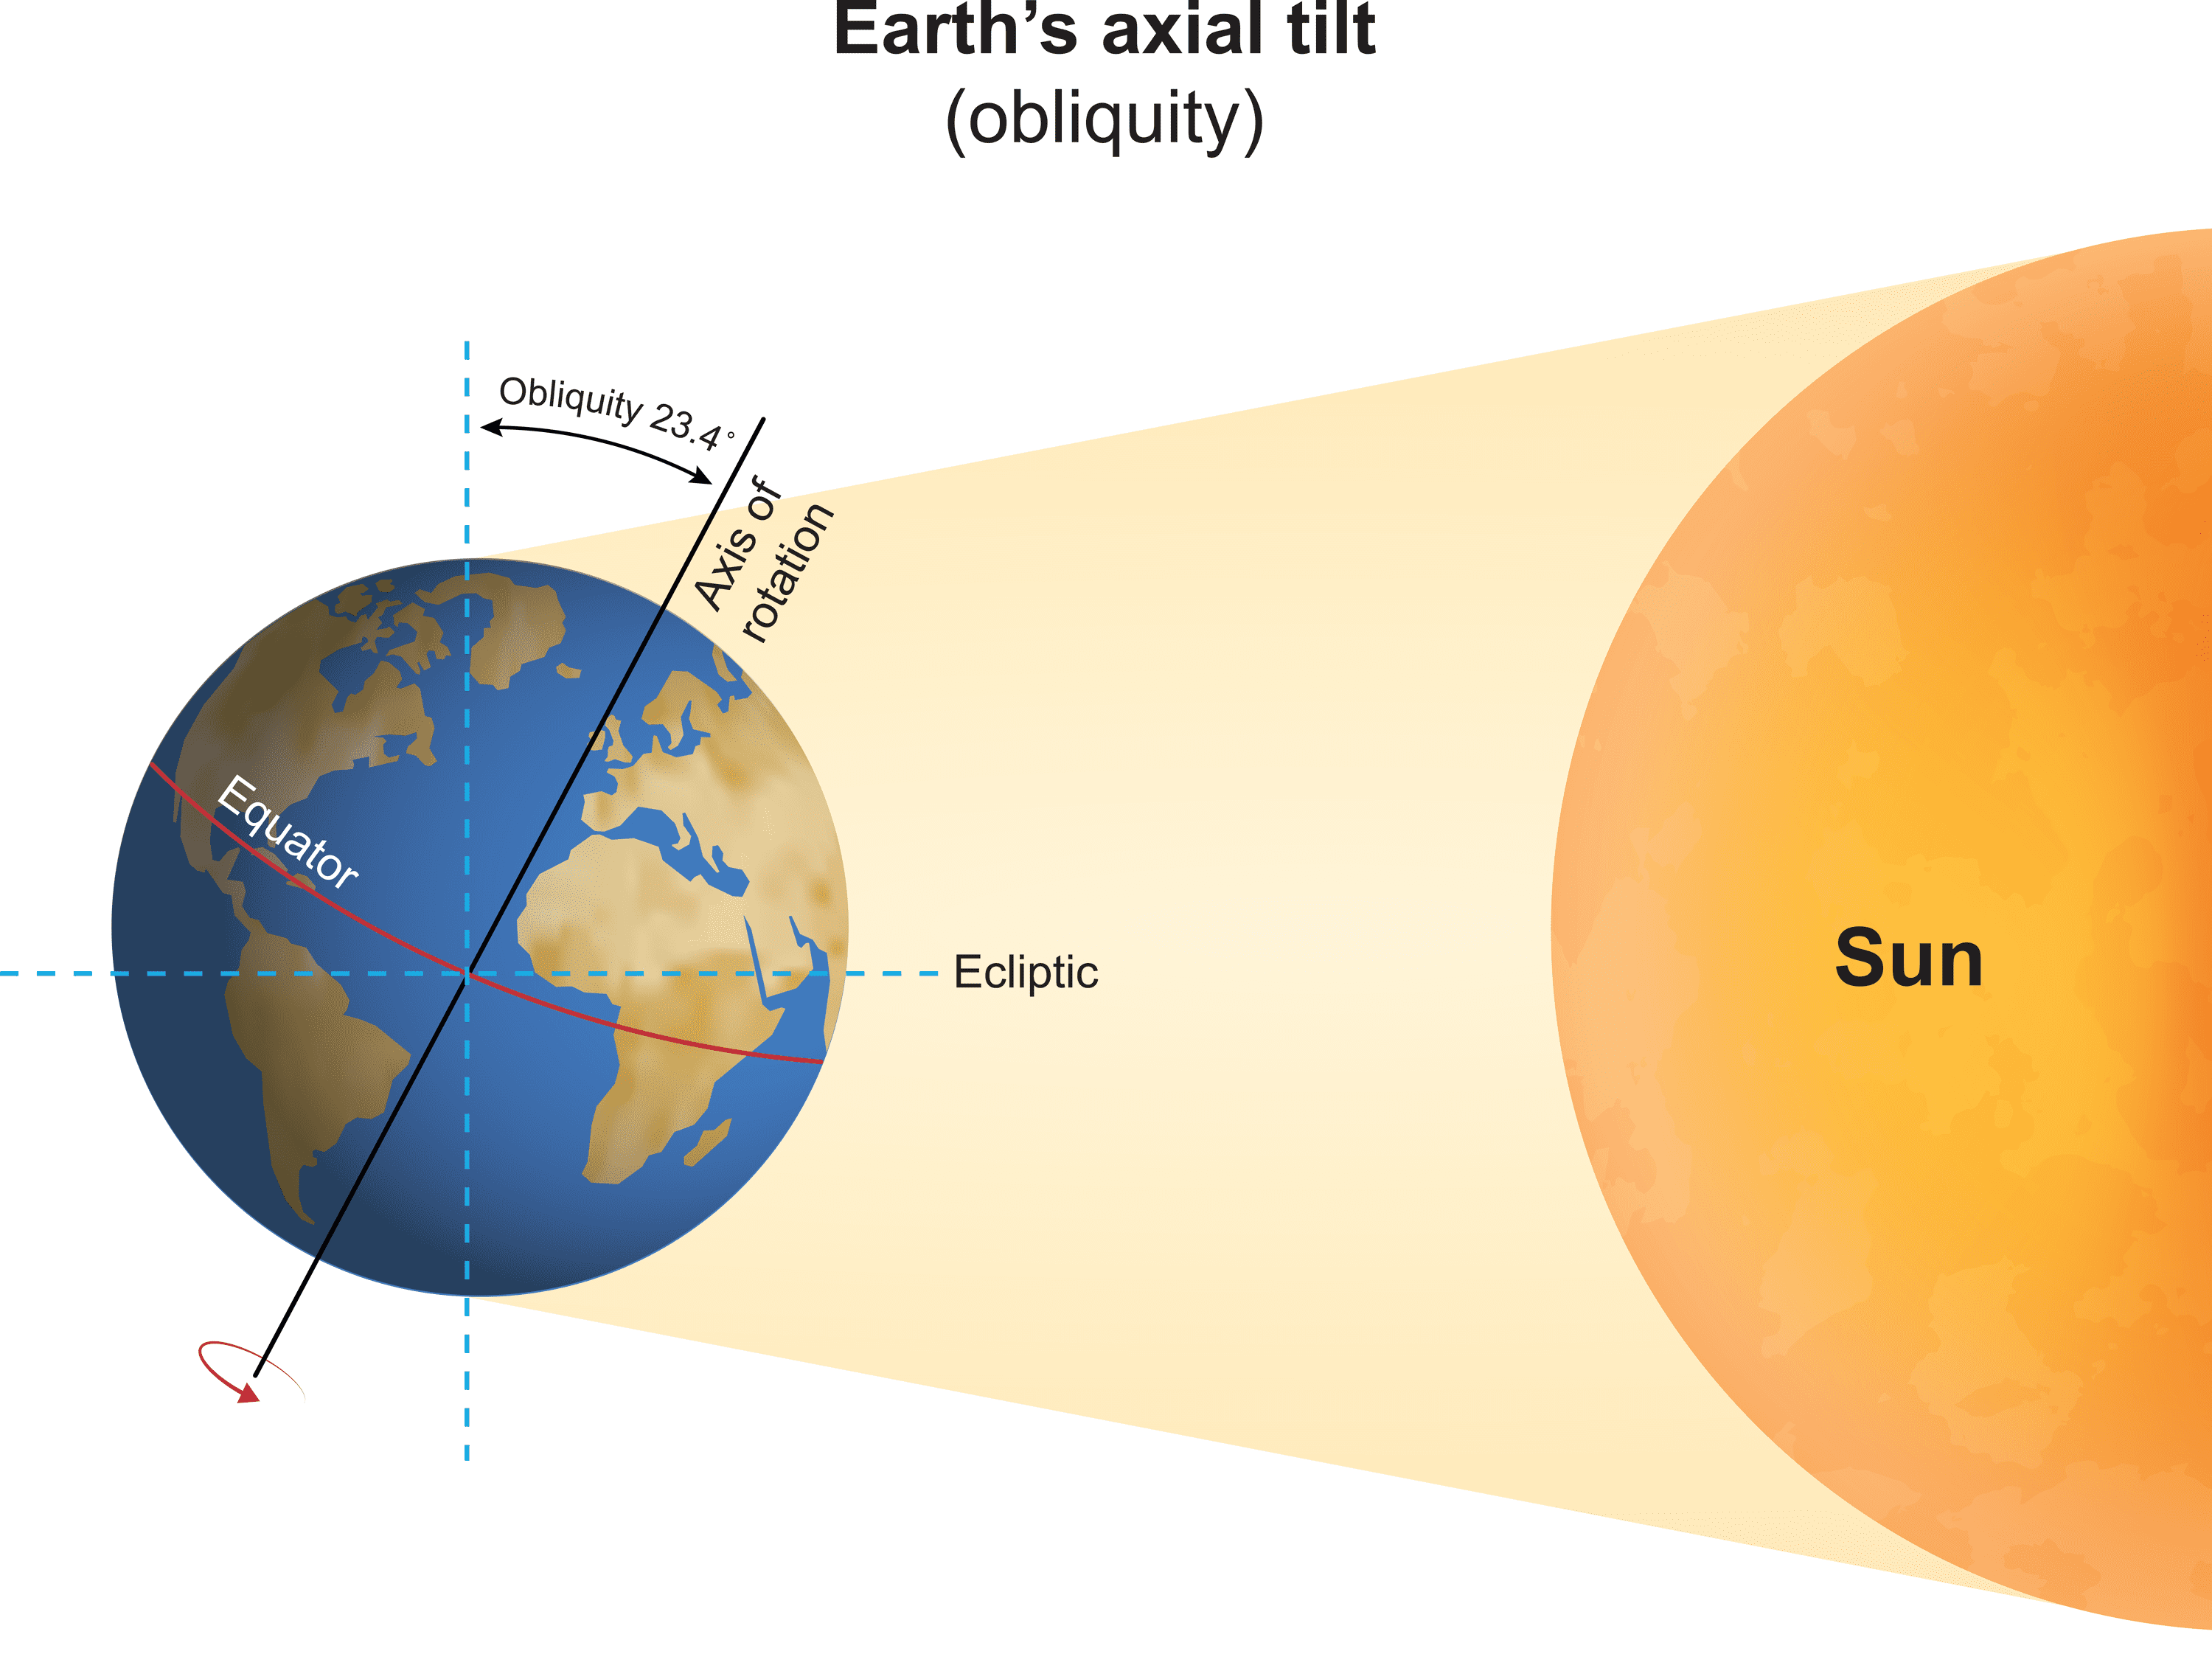
Here’s an illustration of Earth’s rotation relative to the sun (P.S. Earth is actually much smaller than the sun than depicted in this picture.
Let’s explore more examples of rotation around us!
1. Car Wheels
Cars are propelled by rotation (among other things)!
Take steering wheels. A steering wheel is attached to the dashboard, its center fixed, while we rotate the frame around it to steer the car in a particular direction.
The wheels (the ones we attach tires to) are also an example of rotation. They too are attached at the center and rotate around it to propel the car forward or backward.

Car wheels and steering wheels included are a great example of rotation.
2. Spinning Top
Have you ever played with a spinning top or a dreidel?
The tip of the top remains fixed on the ground while the rest of it rotates around that point. This spinning motion demonstrates rotation around a fixed center.
3. Clock Hands
Most of us use our smartphones and smart watches to tell the time these days, but remember clocks?
You may still have one in your classroom.
Mechanical clocks are usually circular and feature 2 pointers, known as “hands,” in the middle. The shorter hand is called “minute hand” and longer pointer is called “hour hand” (dare to guess why?).
The center of the clock, where the hands attach, acts as the fixed point. As time passes, the hour and minute hands rotate around this center to indicate different times of the day.

Remember these?
4. Pirouette in Ballet
One of ballet’s signature moves, pirouette is based on the concept of rotation.
The dancer props themselves up on the tip of their toes on one leg and uses the other to propel themselves around this fixed point in a twirl, a motion also known as—you guessed it—rotation!
Key Terms in Rotation
To truly understand rotation in math, we need to know how to describe it.
Let’s go over some of the terms we use to talk about rotation.
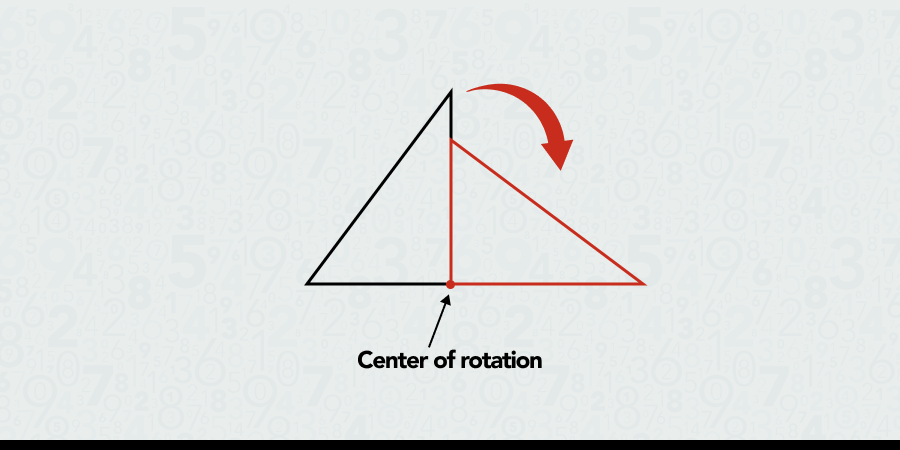
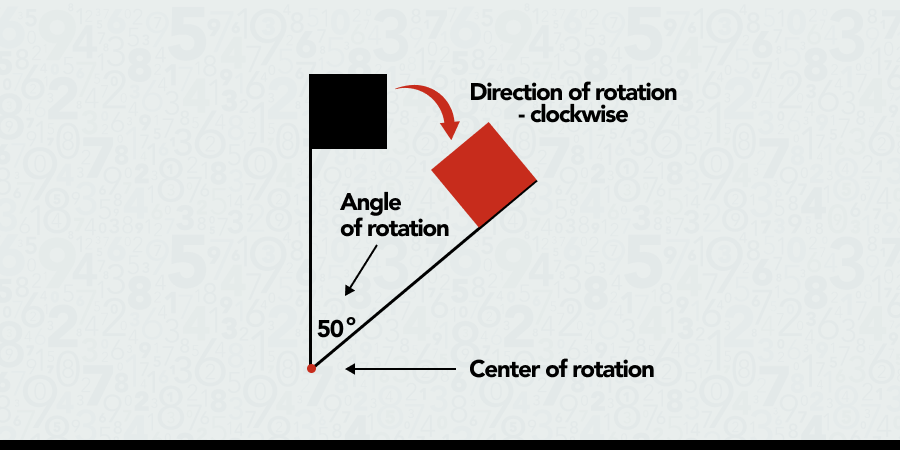
1. Center of Rotation
The center of rotation is the fixed point around which a figure rotates.
It remains stationary while the rest of the figure moves around it.
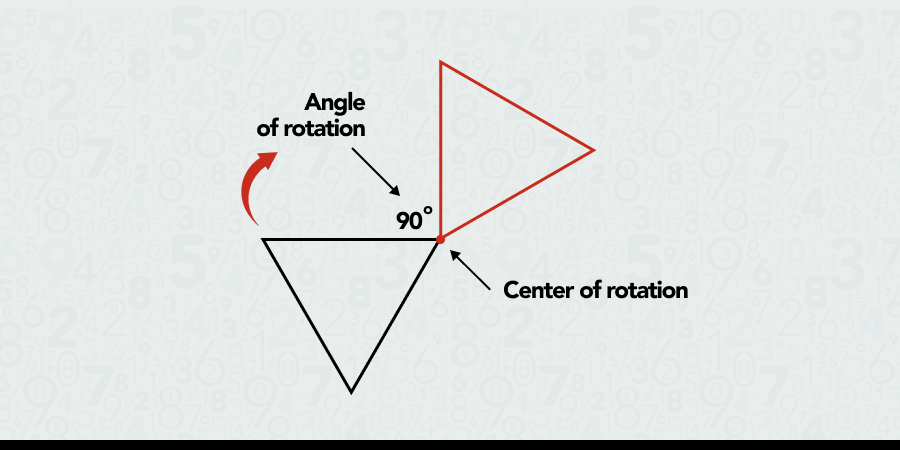
2. Angle of Rotation
The angle of rotation shows how much a figure is rotated around its center.
When students first learn how to rotate figures, the angle of rotation is measured in degrees (°).
The most common angles we use to illustrate rotations are:
- 90°: a quarter turn
- 180°: a half turn
- 270°: three-quarters of a turn
- 360°: a full rotation
3. Direction of Rotation
The direction of rotation indicates the path a figure takes around its center.
Clockwise rotation moves in the direction of a clock's hands: to the right.
Counterclockwise rotation moves in the opposite direction: to the left.
Rules of Rotation
The rules of rotation help us find the new position of a point after it has been rotated around the origin by a certain angle.
The types of rotation depend on the angle of rotation and the direction of rotation.
When learning about rotation in math, we usually use the coordinate plane to illustrate the process where one of the vertices of a figure is the center of rotation. The coordinate plane helps us track and visualize how figures move when rotated.
Let’s look at an example:
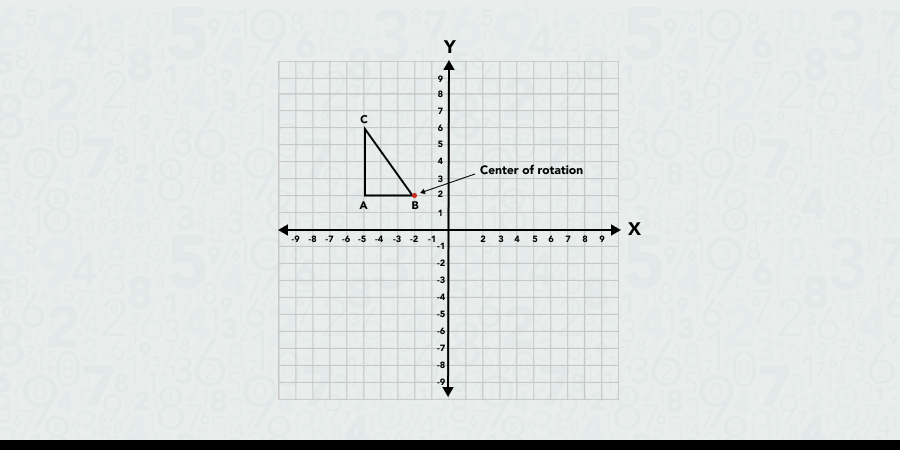
In this case, we will be rotating a triangle whose center of rotation is the vertex B.
To rotate the figure by 90°, we will turn it by a quarter-turn to the left (counterclockwise) or to the right (clockwise) around the fixed point B, a.k.a. our center of rotation.
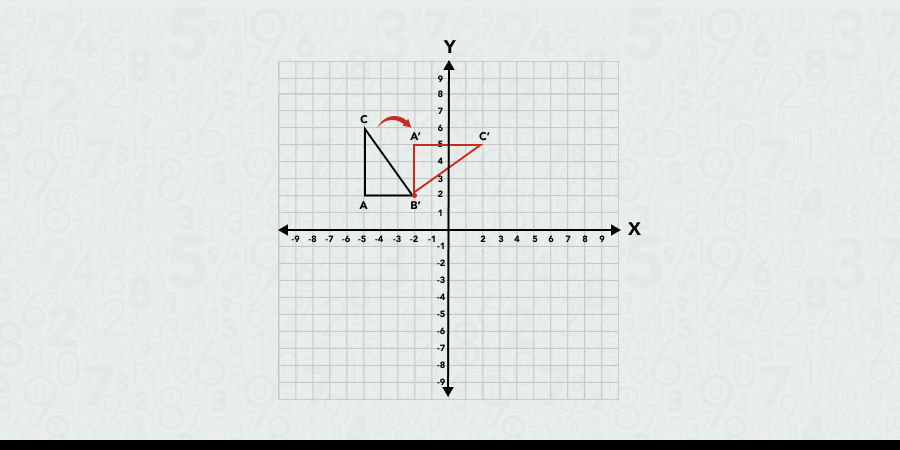
When we rotate the figure by 180°, we will turn it by a half to left or right like so:

To rotate a figure 270°, we turn it by three-quarters around the fixed point to the left (counterclockwise) or to the right (clockwise).
A 360° rotation around one of the vertices would result in a full turn around the fixed point, returning the figure to its original position.
Now, let’s try a different center of rotation – one that is outside the figure we are rotating.
Another common method to do rotations on the coordinate plane is using the origin (0,0) as the center of rotation.
Notice how the x and y axis divide the coordinate plane into 4 quadrants.
When we rotate figures by 90° with the center at (0,0), we are moving the coordinates of our figure into the neighboring quadrant, either to the right or to the left.
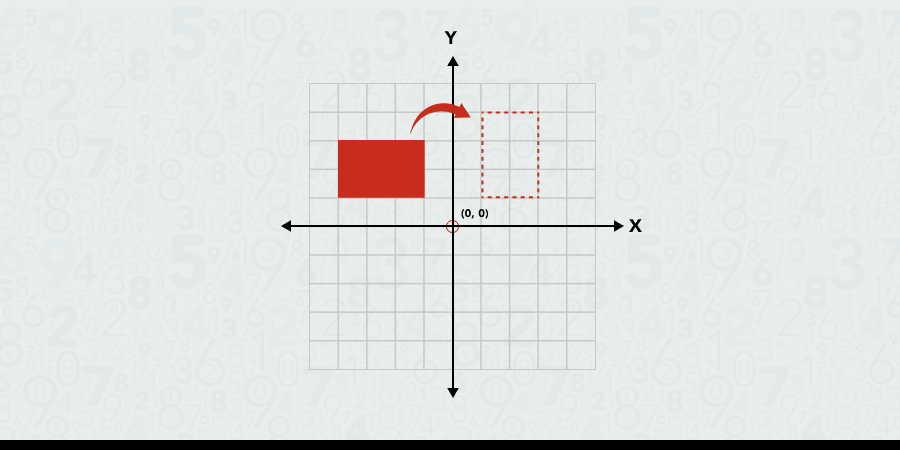
When we rotate:
- Clockwise (to the right), (x, y) coordinates become (y, -x)
- Counterclockwise (to the left), (x, y) coordinates become (-y, x)
When we rotate a figure by 180 degrees on the coordinate plane, we are moving it to the quadrant directly opposite its original position. For instance, if we want to rotate a figure in Quadrant I by 180 degrees, we will end up moving it to Quadrant III.

After a 180° rotation, our (x, y) coordinates simply become negative (-x, -y).
For a 270° rotation around the origin, the figure moves on to the opposite side of the coordinate plane, three quadrants away from its starting position.

When we rotate:
- Clockwise (to the right), (x, y) coordinates become (-y, x)
- Counterclockwise (to the left), (x, y) coordinates become (y, -x)
Here’s a quick overview of what happens to our coordinates when we rotate figures at angles 90°, 180°, and 270° clockwise (CW) or counterclockwise (CCW) on a coordinate plane:
|
Type of Rotation
|
Original Coordinates (x, y)
|
New Coordinates after Rotation (x', y')
|
|
Rotation of 90° (CW)
|
(x, y)
|
(y, -x)
|
|
Rotation of 90° (CCW)
|
(x, y)
|
(-y, x)
|
|
Rotation of 180°
|
(x, y)
|
(-x, -y)
|
|
Rotation of 270° (CW)
|
(x, y)
|
(-y, x)
|
|
Rotation of 270° (CCW)
|
(x, y)
|
(y, -x)
|
How to Rotate Figures on the Coordinate Plane
Now that we know the language and basic concepts in rotation, let’s see how we rotate figures on the coordinate plane.
We can start with an example where a vertex of the figure is the center of rotation.
Our steps are:
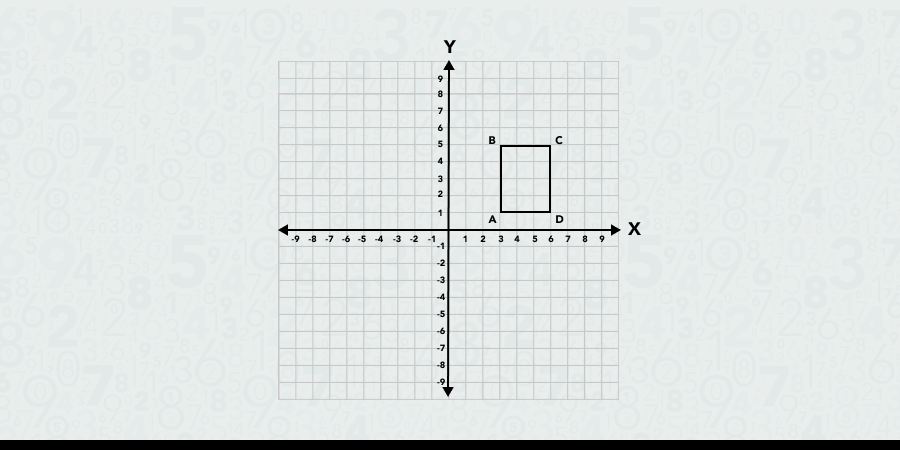
- Draw the original figure on the coordinate plane. In our case, it will be a rectangle.
- Label the vertices (A, B, C, and D) and select one vertex of the rectangle – say vertex A – as the center of rotation.
- Determine the angle of rotation. For example, let’s rotate the figure 90° counterclockwise (to the left).
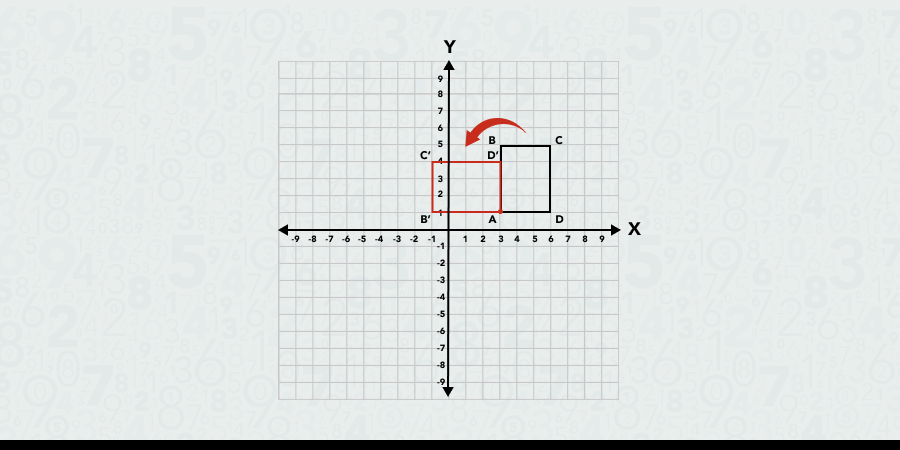
- Visualize the rotation. Imagine the figure spinning around vertex A like a clock hand moving backward. This can help you understand how each point will move.
- Draw the rotated rectangle by moving points B, C, and D 90° around vertex A while it remains fixed.
- Compare the new positions of vertices B, C, and D (now labeled B', C', and D') with their original positions to ensure correct rotation.
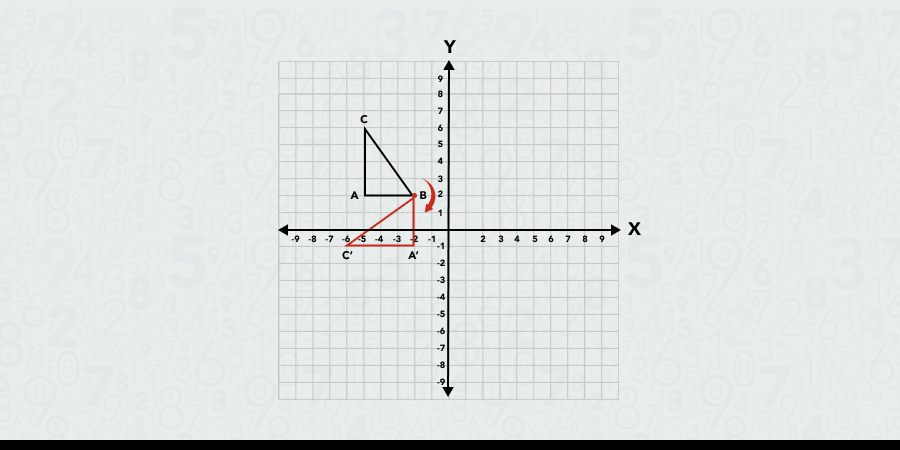
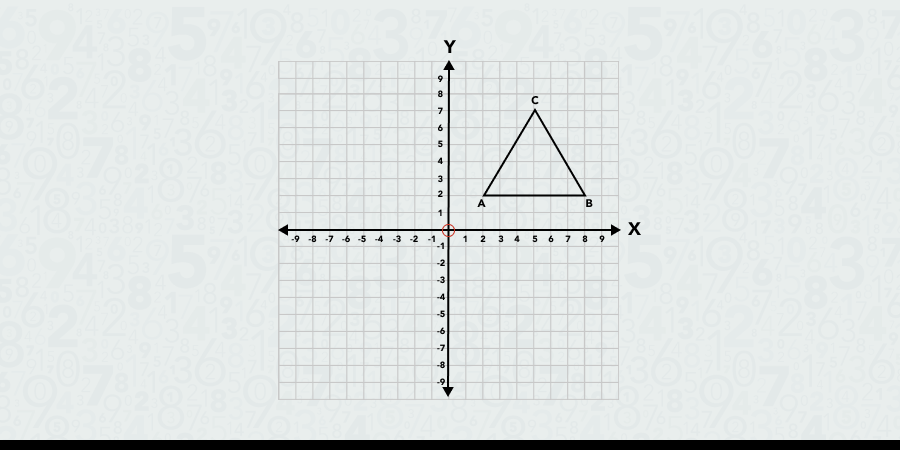
Now, let's rotate the triangle ABC, represented on the coordinate plane below, 90° clockwise (to the right) around the origin (0,0).
First, let’s write down our coordinates:
- A (-5,2)
- B (-5,5)
- C (-1,2)
If we are rotating our triangle 90° clockwise, our coordinates will change like so:
Let’s apply the rule to calculate the new coordinates:
-
A' = (2, – (– 5)) = (2, 5)
-
B' = (5, – (– 5)) = (5,5)
-
C' = (2 – (– 1)) = (2, 1)
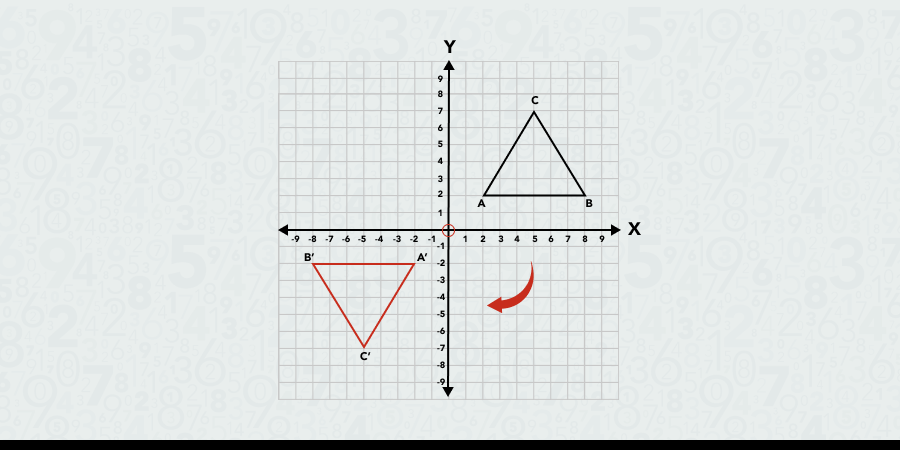
We can now rotate the position of triangle ABC on the coordinate plane using our new coordinates.

Solved Examples of Rotation
Now that we know how to apply the rules of rotation to rotate figures on the coordinate plane, let’s practice rotation using different shapes, angles, and directions.
Example 1
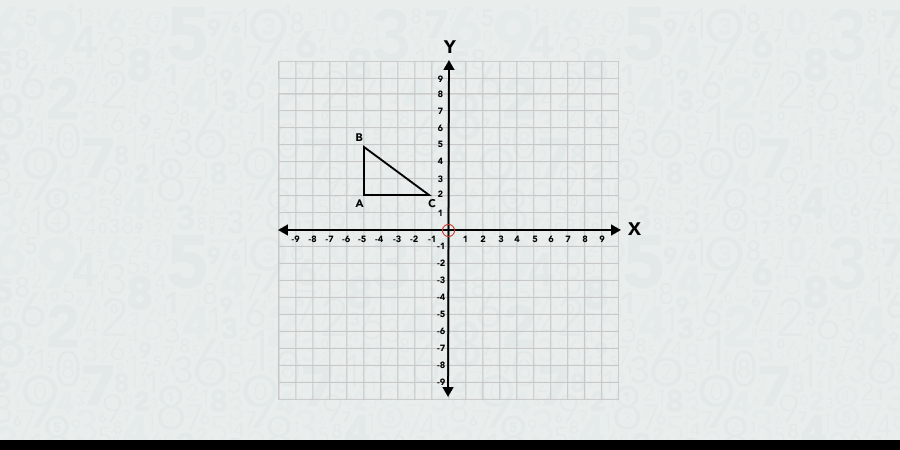
Let’s rotate the triangle ABC by 180° clockwise around the origin.
The coordinates of our triangle are:
Since we’re rotating the triangle 180°, half a turn around the origin (0,0), our values will become negative: (x, y) —> (– x, – y)
Using this logic, the coordinates of our rotated image will be:
-
A' = ( – 2, – 2)
-
B' = ( – 8, –8)
- C' = ( –5, – 7)
With the new coordinates, we can produce the image on the coordinate plane.
Example 2
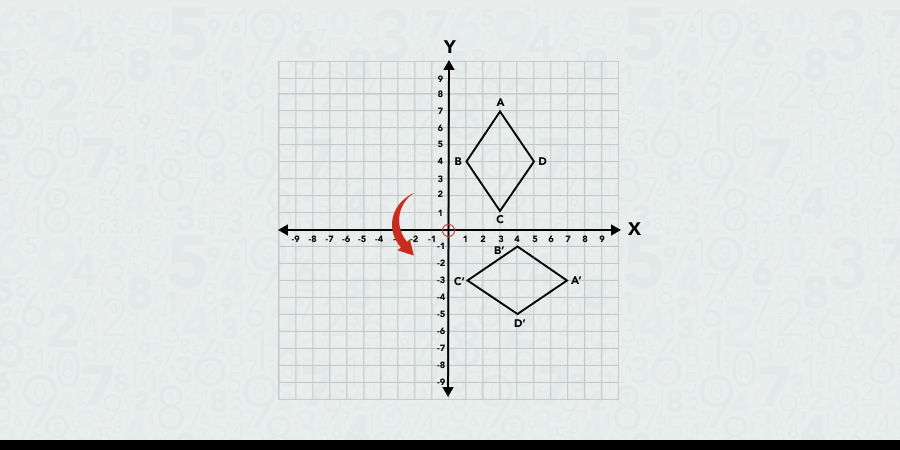
Let’s rotate the rhombus ABCD 270° counterclockwise around the origin.
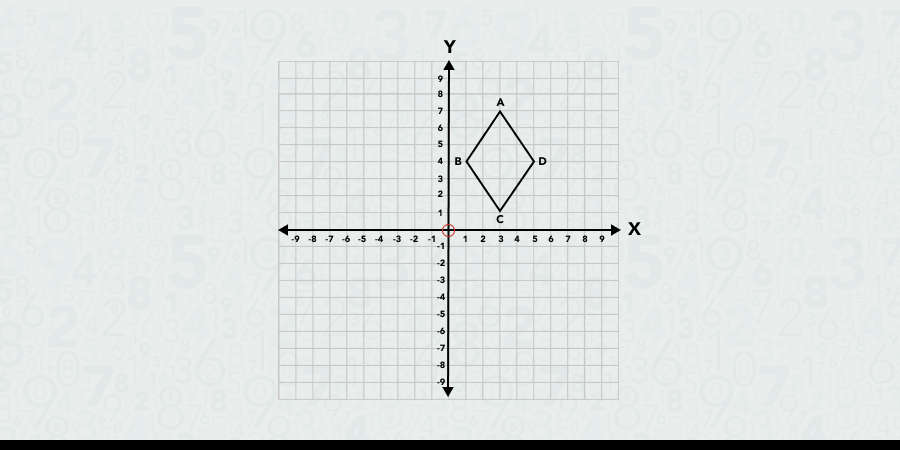
The coordinates of the rhombus ABCD are:
A (3,7), B (1,4), C (3,1), D (4,4)
For rotation of 270° counterclockwise, we use the rule:
You might have noticed that this is the same formula we use for rotation of 90° clockwise.
Now, we calculate the new coordinates:
-
A' = (7, –3)
-
B' = (4, –1)
-
C' = (1, –3)
-
D' = (4, –4)
We have everything we need to produce the image on the coordinate plane.
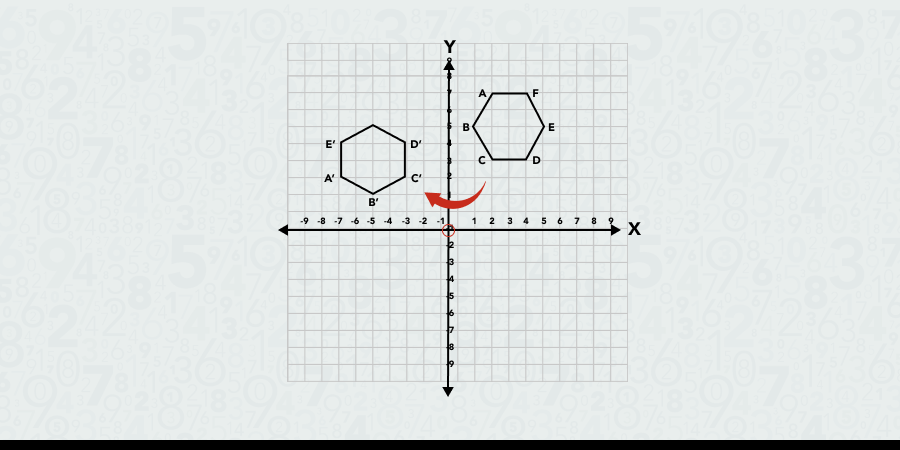
Example 3
Finally, let’s rotate the hexagon ABCDEF 270° clockwise.
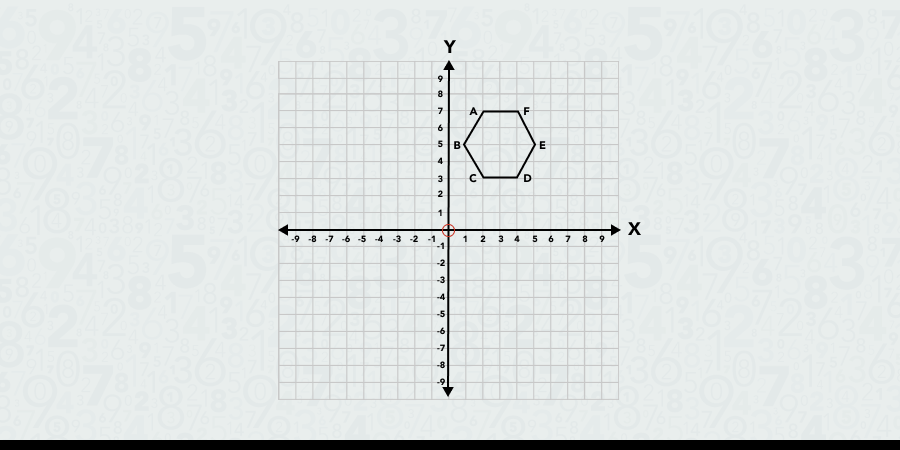
The coordinates of the hexagon ABCDEF are:
- A (2,7)
- B (1,5)
- C (2,3)
- D (4, 3)
- E (5,5)
- F (4,7)
For rotation of 270° clockwise, we use the rule: (x, y) = (–y, x)
Let’s calculate the new coordinates:
-
A' = ( –7, 2)
-
B' = ( –5, 1)
-
C' = ( –3, 2)
-
D' = ( –3, 4)
-
E' = ( –5, 5)
-
F' = ( –7, 4)
Our next step is to produce the image on the coordinate plane
Frequently Asked Questions About Rotation in Math
Here are some common questions about rotation that students often ask us.
1) What happens to a figure if you rotate it by 360 degrees?
Rotating a figure by 360 degrees around the origin brings the figure back to its original position, so the coordinates of each point in the figure remain the same.
2) Can rotations change the size or shape of a figure?
No, rotations can’t change the size or shape of a figure. They preserve the size, shape, and orientation of the figure.
3) Can I rotate a figure by any angle?
Yes, you can rotate a figure by any angle. Common angles like 90°, 180°, and 270° have simple formulas, but other angles can also be used with trigonometric calculations.
4) Are there any shapes you can’t rotate?
No. You can rotate any shape on the coordinate plane, including polygons, circles, and irregular shapes.
Learn and Master Rotations with a Top-Rated Geometry Tutor Near You
Mathnasium’s specially trained math tutors work with K-12 students of all skill levels to help them understand and excel in any math class and topic, including rotation.
Explore our approach to middle school math tutoring:
Our tutors assess each student’s current skills and considers their unique academic goals to create personalized learning plans that will put them on the best path towards math mastery.
Whether you are looking to catch up, keep up, or get ahead in your math class, find a Mathnasium Learning Center near you, schedule an assessment, and enroll today!
Find a Math Tutor Near You

 877-601-6284
 877-601-6284